I'll be the first to admit that I'm no expert at this. But I can at least share some of the basic concepts and give a few examples. To take nighttime shots, you should have an SLR camera with an adjustable lens, either film or digital -- a point-and-shoot camera probably isn't going to cut it.
Turn Off the Flash
The first thing to do is to turn off your flash -- you won't need it unless you're doing something like a portrait against a night background (one thing I haven't tried).
Reducing Motion Blur
The most important difference between night and daylight photography is that it takes a lot longer to capture enough light to make an exposure. For that reason, you will want to use a tripod to keep your camera still -- otherwise, you'll probably end up with a very blurry image. (Although in some cases, you may want that.) In a pinch, you may be able to rest the camera body against a railing or some other solid surface to stabilize the shot.
Night Landscape Mode
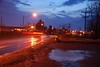
If you have a newer digital SLR, you probably have a setting called 'night landscape'. Kodak just announced some new additions to its EasyShare line that have this feature, but aren't priced to bankrupt ($150-250). This is a really good starting point, especially if you want to do a sunset shot where the foreground isn't just a silhouette, or a panoramic image of a city skyline or the like. To be fair, pictures taken this way can look a bit overexposed, though, like this one:
To do more advanced night photography, you need the same basic things you would need to make an exposure for any other kind of photography. Having an SLR camera with a manual setting gives you control over the following elements:
- Sensitivity in capturing light, via either film or a digital sensor, measured as ISO rating (somewhere between 100-4000)
- The size of the opening that the light comes through. This is referred to as aperture, or depth-of-field (typically between f/3.5 and f/22)
- The amount of light that enters the camera through the shutter, aka shutter speed. This is measured in seconds and can be as long as 30 minutes or more, or as short as 1/1000 of a second (the upper and lower limits will depend on your camera)
Understanding a little about all three will help you get better shots, night or day.
Manual Focus
In many cases, the auto-focus feature on your camera isn't going to know how to focus a night shot. You may have to switch to manual focus mode.
Optimizing ISO
Using film with a higher ISO rating, or setting the digital sensor to a higher ISO value, means that you can use a faster shutter speed and/or greater depth-of-field. The trade-off to this is that really sensitive film is expensive, and higher digital ISO settings can produce grainy images or unwanted noise (random white pixels). Here's an example of a high ISO (3200) shot:
Here's an example of a relatively lower ISO shot (1000) taken with about the same amount of ambient light:
Lower ISO values translate to more color saturation, so I tend to keep the ISO as low as possible and rely on the tripod and a shallow aperture (f/3.5 - f/5) to help compensate.
Optimizing Aperture
Aperture, or depth of field, determines how far into the background distant objects will remain in focus. A shot taken using a shallow aperture setting (f/3.5) requires much less light to expose than a deeper aperture setting (f/22), so keep it shallow if you can, unless you want more depth of field, like in this mid-range shot taken at an aperture of f/10:

Optimizing Shutter Speed
The faster your shutter speed, the less motion blur you get, so plan accordingly. In some cases, you want that blur for artistic effect. In others, it might keep you from capturing what you want.
Putting It All Together
Adjusting your ISO rating and depth-of-field can allow you to lengthen or shorten your shutter speed -- increasing or decreasing motion blur as desired. Increasing the aperture (making it shallow) can produce an attractive light blur in a cityscape. A higher ISO might be able to capture silhouettes of geese flying against a sunset, where a lower wouldn't.
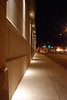
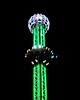
If there's a formula to making this all work consistently, I don't know it -- I wish I did. I find that my camera's light meter is pretty reliable for taking shots of spotlit buildings, like the one below:
However, I find that I have to wing it if I'm doing landscapes or scenes with a lot of bright light sources. The light meter didn't help me at all with this one -- I took shot after shot until it looked somewhat right in the LCD (which tends to show exposures brighter than they really are):
I shoot digital these days so I tend to take 4-5 shots of the same thing at exposure levels at, above and below what the light meter suggests, and pick the best one later. (That's a really expensive habit if you're shooting film -- not sure what to tell you there.)
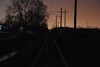
In a long exposure, an object in motion will seem to disappear unless it's really bright. In this shot taken near dusk, my daughter's arm was moving so it blurred out almost completely (not a great shot but it demonstrates the concept):

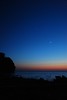
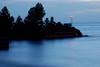
Likewise, this shot captures a boat coming into the marina at French Creek -- the only objects bright enough to be picked up in the exposure were the ship's running lights:
If you've ever seen a shot with a night highway full of red and white trailers -- same basic concept.
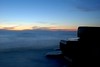
And at a slow enough exposure, waves start to look like fog:
That's about all I can tell you right now. Like I said, I'm still figuring out how to do this stuff. Flickr has groups for just about anything and everything, and some incredibly talented photographers -- both locally and globally. Check it out, and if you see stuff you'd like to know how to do, ask. Most people are more than happy to talk about their work and help you improve your own technique.
Happy shooting!
1 comment:
Thank you SO much for writing this. It's exactly what I needed to know.
Post a Comment